How to install Kitchen Taps
Kitchen taps as we know, are the center piece of functionality within the kitchen. The tap design is so important being the centre of attention and is one of the most used fittings within a household. Over the years however, the most used piece in the kitchen may need to be changed due to wear and tear or breakage. When buying a new tap, it is important to find value for money in both the quality of the tap, and price. Rather than relying on a tradesman, you can also reduce your costs further by installing the tap yourself. Here is an installation video to help you get started.
1. Make sure you have the correct tools
- Wrench/Pliers
- Bucket
- Sealant and Sealant Gun
- Select the appropriate kitchen tap for your sink. Standard taps typically require 1 to 3 holes in the sink.
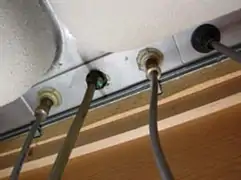
- Turn off both the hot water and cold water supply lines. Shut off valves typically are in the cabinet below the sink.
- Turn on the old tap to relieve water pressure in the lines. Make sure both are empty before proceeding.
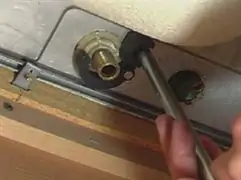
- To remove the tap - unscrew the nuts holding holding the faucet in place from underneath the sink. Use a basin wrench, a standard wrench, or pliers, as space permits.
2. Installing the new tap
- Some kitchen taps include a putty plate. Place the putty plate onto the deck plate also supplied.
- Apply a bead of plumbers putty in the groove of the putty plate. Your tap may have included a rubber or plastic gasket instead of a putty plate. 1 hole taps use the gasket rather than the putty plate. If that's the case, just set the gasket or the appropriate sink holes, then proceed to the next step. If your tap did not include a gasket or putty plate , place plumber's putty on the underside of the rim on the deck plate, then proceed to the next step.
- If your using the deck plate, place it over the appropriate holes.
- Insert the tap pipes into the sink holes.
- From under the sink, install the washers and mounting hardware following the taps manufacturers instructions. Tighten the nuts by hand, and verify that the tap, and the deck plate are straight and are in the right positions before continuing. Tighten the nuts with a wrench being careful not to over tighten.
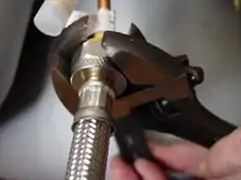
- Attach the water supply to the tap - some fittings require plumbers tape around the threaded part of the hot and cold water supply lines. Just wrap it around the threads in a counter clockwise direction. Hand tighten the supply lines to the water connections from the tap.
- Finally, tighten the connections with wrenches.
3. Leaks
- Make sure the tap is in the off position then turn on the water supply lines, check for leaks.
- If no leaks are found, turn on the new tap and check again for leaks.
- TIP: To identify the source of a leak, carefully touch a water line (careful if hot) to determine if it is wet.
- If the line is wet, the leak is above your hand. Continue touching higher on the lines and fixtures to identify the source.
- The most common causes of new installation leaks are loose connections, inadequate wrapping with plumbers tape, missing gaskets, and mis-threading.
View our range of kitchen taps
